Introduction
Levels Beyond introduced a Reach Engine Panel Extension for several Adobe Creative Cloud® software applications to assist with the production process, allowing users to access the Levels Beyond repository to work with assets. As of May 2018, the following software can have the Levels Beyond extension installed:
- Adobe Photoshop®
- Adobe Illustrator®
- Adobe InDesign®
- Adobe AfterEffects®
Benefits
The benefit of having the Panel Extension allows access to all your production within the Levels Beyond repository. All assets become integrated into the move-to-production process.
For additional information: {+}https://www.reachengine.com/+
What's New?
0.5.0 Release
- Installation Instructions
- Cancel Search
- Setting Initial Preferences for Source and Proxy
- Creating a collection
- Ingesting assets
- Opening assets
- Showing versions of assets
- Ingest asset into collection from application
- Reviewing asset status
- Updated pathmapping
Installing Reach Engine Panel Extension
The Reach Engine Panel Extension is available for both Mac and Windows users. To download the installation package, select the associated link:
Mac: reach-engine-panel-extension-0.5.0.pkg
Windows: reach-engine-panel-extension-0.5.0.exe
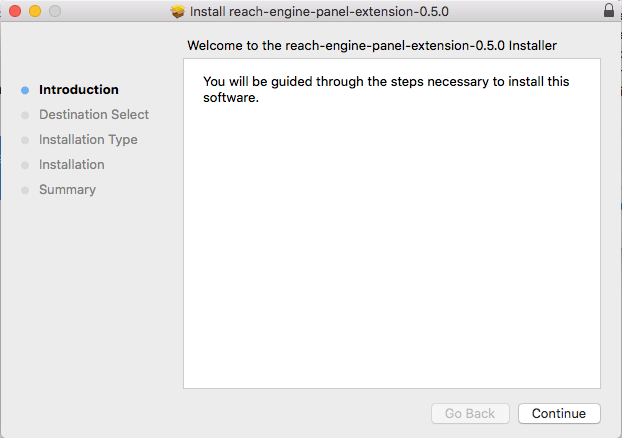
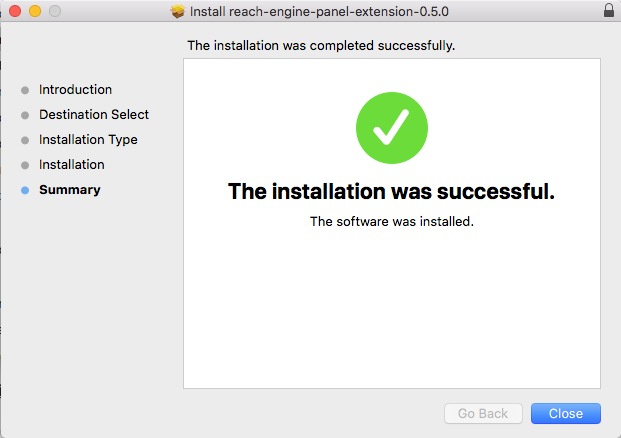
To install the Reach Engine Panel Extension:
- Download the .pkg or .exe from the associated link.
- Double-click the package.
- Click Continue on the Introduction panel.
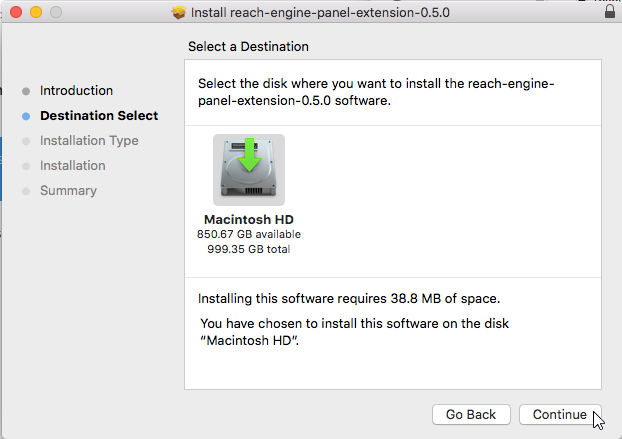
- Navigate to the disk where to install the package and click Continue.
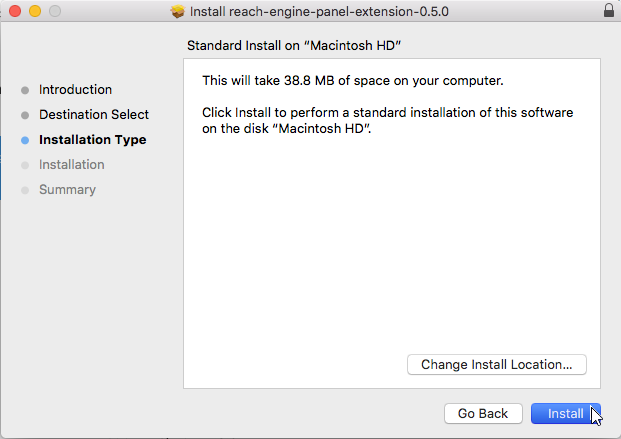
- Click Install to install the Reach Engine Panel Extension.
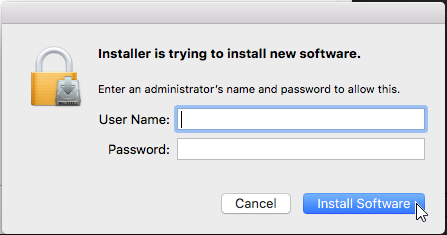
- If required, enter the Administrator User Name and Password and click Install Software.
- Click Close.
Using Reach Engine Panel Extension
The Reach Engine Panel Extension from Levels Beyond lets you access assets that previously were not as easily accessible for Adobe products other than Adobe Premiere and Adobe Prelude. Having an extension that can be loaded into other Adobe applications makes it easier to use and modify assets during the workflow process.
Accessing the Levels Beyond Extension Panel
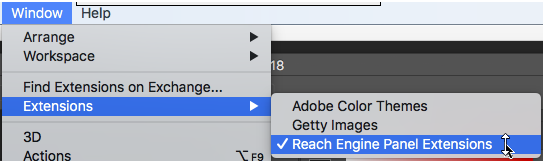
After the extension has been installed on for your Adobe products, the extension panel can be accessed similarly regardless of which software product you are using. To access the extension panel:
- In your application, navigate to Window > Extensions > Reach Engine Panel Extensions.
- Click the the selection to display the Preferences screen.
Setting initial Preferences
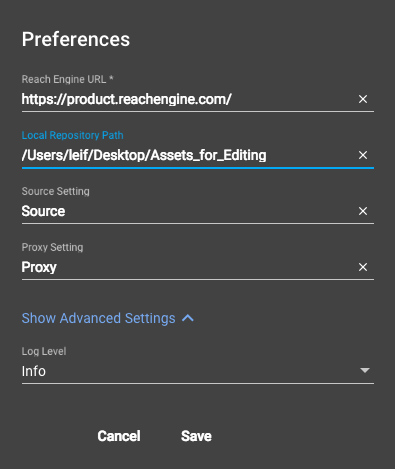
The Preferences dialog box displays the first time accessing the Reach Engine Panel extension. To set up the preferences for accessing your assets:
- Enter the Reach Engine URL. This address can be an http or https URL.
-
(Optional) Enter the Local Repository path where you want your assets to download to.
- (Required) if Reach Engine is configured with cloud storage.
- (Not Required) if Reach Engine is configured with local storage.
-
Enter the Source settings:
-
Enter the Proxy setting:
-
Click Show Advanced Settings to set additional preferences for the level of detail required for error logs:
- Error
- Warning
- Info
- Verbose
- Debug
- Click Save.
Notes:
-
Preferences can be changed by clicking the Settings icon
 .
.
-
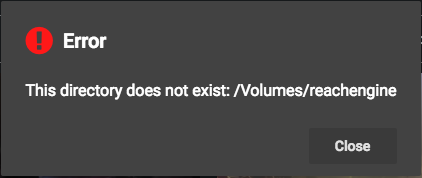
When there is no access to storage, the following error message displays:
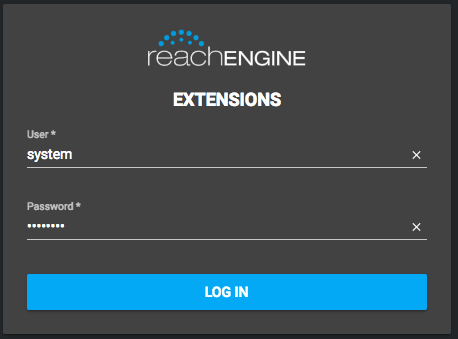
Logging in to Reach Engine Panel Extensions
The Login dialog panel displays after setting your initial preferences, and every time afterwards when accessing the extension. Your username and password are assigned to you via Reach Engine To login:
- Enter your user name in the User field.
- Enter your associated password in the Password field.
-
Click LOG IN.
 Notes:
- The login screen varies based on your individual setup, including logo and other branding information.
-
Reach Engine will automatically log you out, and display a Keep Alive warning to continue your session.
- The time before the "Keep Alive" warning displays is dependent on the Reach Engine server logout settings.
- The Server logout setting is customizable by the client
Working with assets
The Extension Panel is divided into two tabs: Dashboard and Status. When the panel is opened, all assets within your repository are accessible to work with in the desired application. You can use the panel to search for an asset, sort assets, open the asset within the application, or view the status of an asset.
Viewing assets (Dashboard tab)
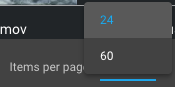
To view assets on the Dashboard:
- Select 24 or 60 from the Items per page list menu to select the number of asset thumbnails to view per page.
- Scroll through the assets using the scroll bar on the side, or sort the assets using the panel's sorting functions.
Sort assets
Assets can be sorted by several options, and listed according to preferences in the Sort By selection switch. To sort the assets on the Dashboard,
-
Select Date Created, Date Updated, Name, or Relevance from the sort menu:
-
Date Created and Date Updated:
-
 sorts the dates by newest to oldest
-
 sorts the dates by oldest to newest
-
Name:
-
sorts the names from A-Z
-
sorts the names from Z-A
-
Relevance:
-
sorts the title from most to least relevant
-
sorts the title from least to most relevant
- Review the assets by using the scroll bar on the right side of the panel.
The table indicates the asset type by icon:
Review by Asset Type
You can review the asset grid by asset type:
Asset Type and Display Icon
- Timelines

- Videos

- Audio

- Images

- Documents

- Other File Types

- Collection

- Projects

- Markers

- Timeline Clips

- Video Clips

Searching for assets
To search for one or more assets with your Reach Engine repository:
- Enter the characters (alphanumeric, or special character). The asset list updates based on the characters entered.
- (Optional) click Advanced Search.
-
Select one or more asset types:
- Audio
- Documents
- Images
- Collections
- Markers
- Others
- Projects
- Timelines
- Timeline Clips
- Videos
- Video Clips
- (Optional) Select one or more categories from the metadata Categories drop-down list in which to search.
- (Optional) Enter the dates between which the asset was made or added in the Created calendars.
- (Optional) Enter the dates between which the asset was modified in the Updated calendars.
- Click Search. The results display in the panel, and can be sorted as needed.
- Click X in the search field to Cancel the search.
- Click Reset. The search results are reset.
Working with assets
Selecting assets for use
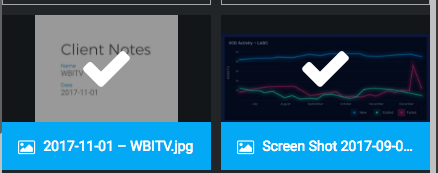
One or more assets can be selected for use. To select one or more assets:
- Click an asset in the panel. A check mark displays to indicate it's been selected.
- Continue to select as many assets as needed.
-
Click the download button
 to store the asset in your local folder if configured with cloud storage. The asset will be imported to application and remain in the Reach Engine repository if configured with local storage.
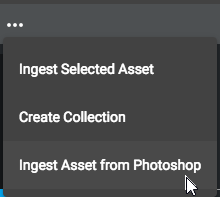
Creating a Collection
A Collection can be created to work with ingested assets. To create a Collection:
-
Click the Action menu

- Select Create Collection.
- Type the Collection name.
- Click Create.
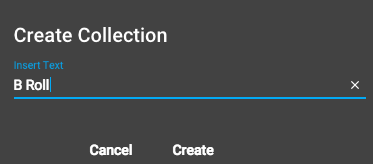
Note: Collections can be created by also selecting an asset to ingest and clicking the Create Collection button (+). 
Ingesting assets
To ingest assets into an existing collection:
- Select the asset or assets to ingest.
-
Click the Action menu
- Select Ingest Selected Asset. The Ingest Assets panel displays.
- Select a collection from the drop-down arrow.
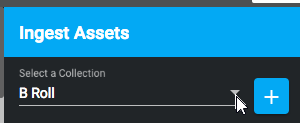
- Click Ingest. The Status tab indicates the progress of the asset ingestion.
Ingesting assets from application to collection
The Extensions panel allows you to ingest an asset from the application in which you're working into a collection. For example, in Photoshop, you can ingest an asset from Photoshop into a collection. To use this feature:
- Select a collection.
-
Click the Action menu
- Click Ingest asset from (application)
- Select the asset from the panel.
- Select a collection (shouldn't the collection already be selected/displayed? Do you have to select it twice?)
- Click Ingest. The Status tab displays the progress of the ingest.
Opening assets
To open an asset in the associated application (for example, opening a .jpg in Adobe Photoshop):
- Select the asset or assets to ingest.
-
Click the Action menu
- Click Open Selected Asset. The Status tab displays the download progress of the asset. The asset opens when upon successful download.
Showing versions
The Show Versions option allows you to review the version changes of a selected asset. This option only displays when a single asset is selected. To review the versions of an asset.
- Select the associated asset.
-
Click the Action menu
- Select Show Version. The Versions panel displays with all versions of the asset, with associated data.
- Select a version of the asset to save and click Save Current Version.

Each asset has metadata that can be reviewed. When the asset is selected, the Extensions panel applies any configuration from the local file, similar to Premiere and Prelude. To see the asset metadata detail:
- Double-click the asset. The asset detail screen displays.
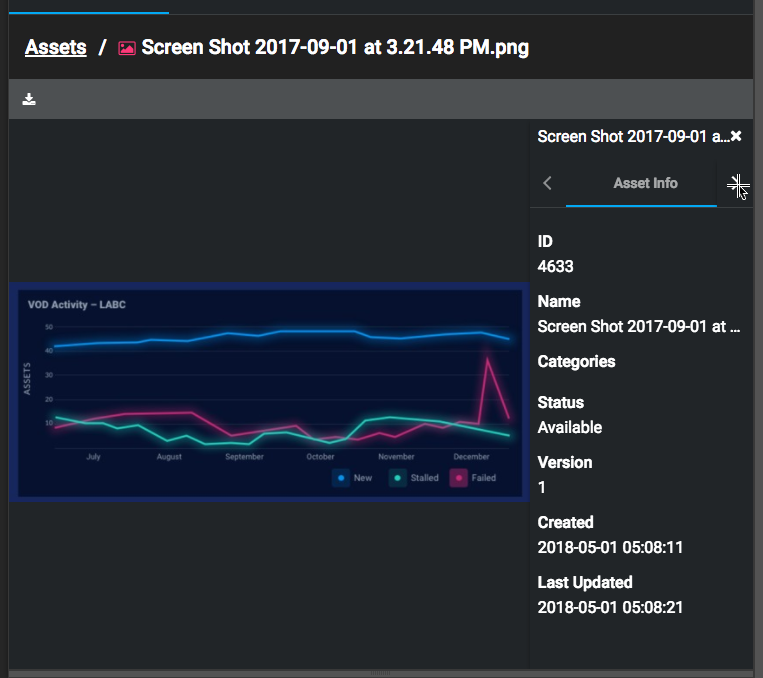
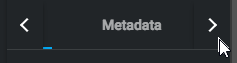
- Click the < or > arrows to review additional metadata information for the selected asset.
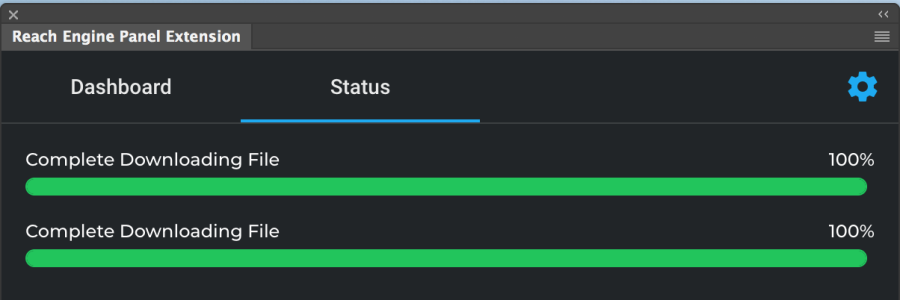
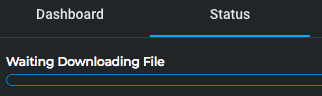
Reviewing asset status (Status tab)
To review the action status of an asset, click the Status tab. The current status of the selected asset displays with a color bar indicator:
- Completed workflows = Green (100%)
- Executing workflows = Blue (.01 - 99.99%)
- Failed workflows = Red (any %)
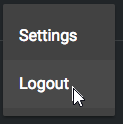
Logging out of Reach Engine Panel Extension
To log out of the Reach Engine Panel Extension
-
Select the Settings icon .
- Choose Logout.